Last week we built the machines.
This week we set them up and RUN!!!
A note from Richard,
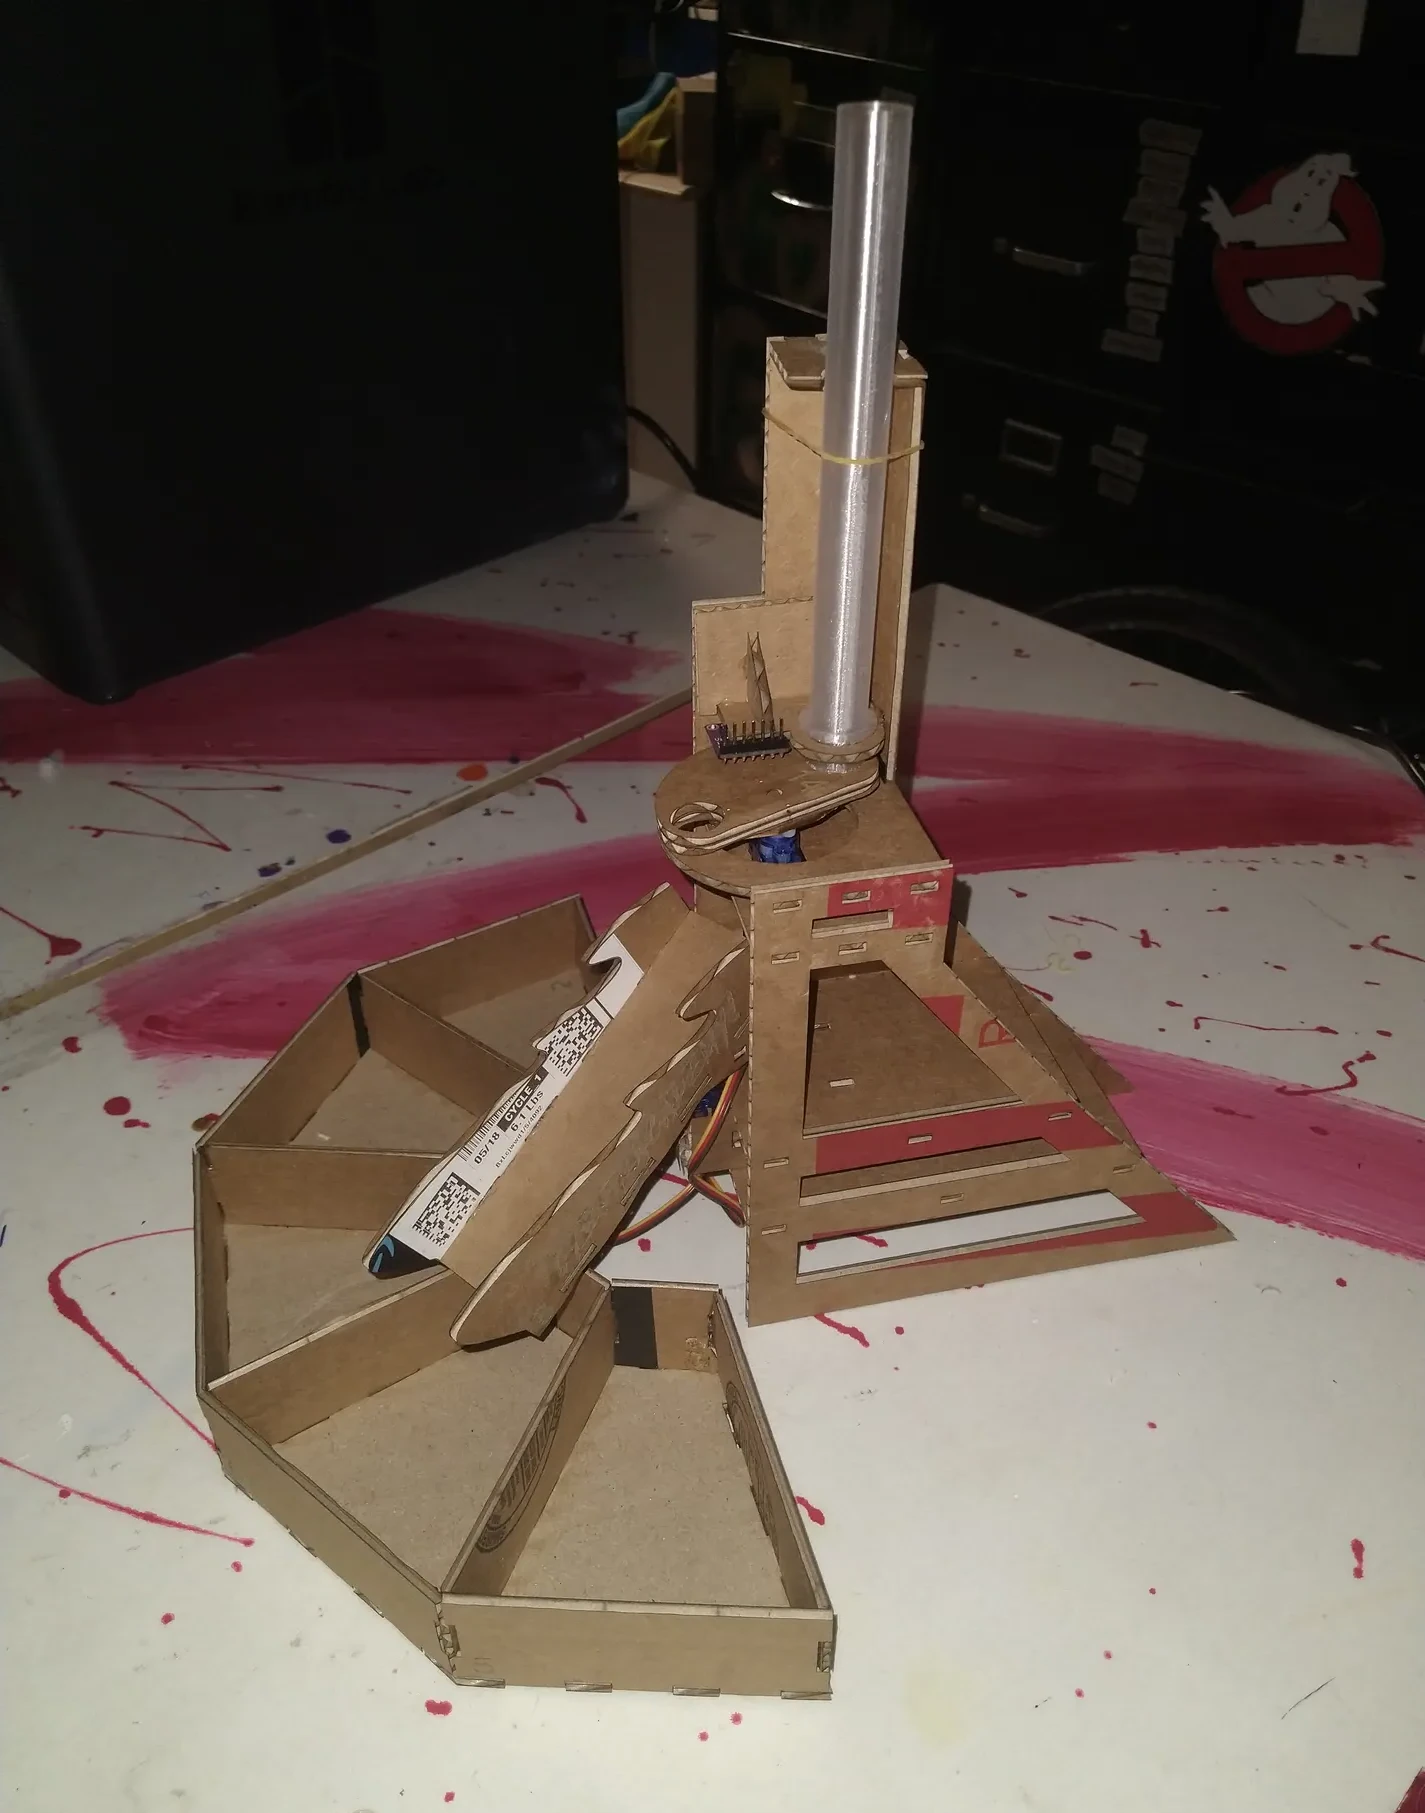
To anyone new to this project, last class we built the “body” of the machine. Tonight we wire “the brain” and tell it what to do. Mr. E’s vision is to display these machines at the library as an example of the possibilities you and I can create with a $7 microcontroller, some bobbles laying around the house, and some ingenuity.
To everyone who attended last class: Give yourselves a big round of applause for your progress in putting these machines together the last time we met. Mr. E asked me to finish the machines for you and I must say.. I was super impressed the quality and thoughtfulness I saw in everyone’s work! Great job!
I apologize that I do not have as many pictures for you this week. Setting up your cool new laptops took longer than I expected and I agree that these instructions are a little lacking compared to last time. There’s an adult at each table to help out and if your team has questions, come find me.
Remember to share the workload with other team members at your station. Ideally I would have one machine per Cyber Academy Member but I’m just not there yet so we need to share as we work. I know things are exciting but be sure to include everyone with the project. If you see someone sitting off by themselves, be sure to ask them “what wire goes where? (even if you already know).” I’m sure they would love the invite to help.
Without further adieu, let’s get started!
Here’s your code. Wiring diagram is at the very beginning of the code. Wire colors don’t matter as long as it’s wired correctly so if you can’t find a red wire for positive, any color will work as long as you keep things straight in your head about which color is which.
Code to copy into Arduino IDE.
* Skittles Color Sorter Machine
 for demonstration in the Cyber Academy Classroom
 By Richard Mendenhall Jr.
 7/18/2025
 rmendenhalljr@gmail.com
 all rights reserved.  */

//I kept the color thresholds tight on the setup program so they wouldn't overlap each other.  You can open them up a bit for better accuracy.

//still to do:

//add tray to body tabs maybe?
//write install programs for servo rotor


/*WIRING CONNECTIONS!!!!     WIRING CONNECTIONS!!!!   WIRING CONNECTIONS!!!!   WIRING CONNECTIONS!!!!   WIRING CONNECTIONS!!!!
/
/                                            _,     _   _     ,_
  top servo is pin 9                     .-'` /     \'-'/     \ `'-.         ARDUINO    +5v    GND       A5   A4       PIN 8
  bottom servo is pin 10                /    |      |   |      |    \                     |     |         |    |         |
  Servo red wire = +5V                 ;      \_  _/     \_  _/      ;                    |     |         |    |         |
  Servo brown wire = GND              |         ``         ``         |                   |     |         |    |         |
  TCS34725 LED is 8                   |                               |                   |     |         |    |         |
  TCS34725 SDA is A4                   ;    .-.   .-.   .-.   .-.    ;                    |     |         |    |         |
  TCS34725 SCL is A5               jgs  \  (   '.'   \ /   '.'   )  /                     |     |         |    |         |
/                                        '-.;         V         ;.-'         TCS34725    VIN   GND  3V3  SCL  SDA  INT  LED
/                                                                                                    |              |
/                                                                                                    |              |
/                                                                                                not used       not used
/                                                                                   TCS34725 Back side as seen mounted on machine. */


#include <Servo.h>
#include <Wire.h>
#include <Adafruit_TCS34725.h>

// Initialize the TCS34725 sensor with default integration time and gain
Adafruit_TCS34725 tcs = Adafruit_TCS34725(TCS34725_INTEGRATIONTIME_50MS, TCS34725_GAIN_4X);


//declare variables

//system
Servo TopServo;  // create servo object to control a servo
Servo BottomServo;  //create servo object
String key; //variable to catch information the user types into the serial monitor
const byte pinLED = 8;

//servo angles
const byte TubeAngle = 10;  //servo angle for the rotor to stop to catch a Skittle
const byte SensorAngle = 80;  //servo angle for the rotor to stop at TCS34725 Color Sensor
const byte DropAngle = 170;  //servo angle to stop to drop a skittle down the hole.
const byte MaxChuteAngle = 160; //max limit we can turn the chute before it bangs into the frame
const byte MinChuteAngle = 26;  //min limit we can turn the chute before it bangs into the frame.

//operational flags
bool MachineOn = false;  //turn machine on or off
bool SetupMode = false;  //flag to enter setup mode
bool DemoMode = false;   //flag to enter demo mode
bool TopServoActive = false; //flag in setup mode to determine if user wants to move the top or bottom servo

//delays
const int WaitOnServo = 255; //pause time to wait for servo to do it's job.
const int WaitLong = 400; //pause time to wait for servo to swing all the way back around to tube.
const byte LEDDelay =255; //how long to light light before taking a reading
int ChuteDelay = 1000; /*the time we'll wait to move the chute, We don't have enough power to fire both servos at the same time.
                       //Arduino will reset if they're are fired even REMOTELY at the same time.*/

//color related
String ColorNames[6] =    {"RED", "Orange", "Yellow",  "GREEN",  "PURPLE", "MISFIRE"}; //color names for reporting back to the serial monitor
float LowVal[6] =         {4.24,     8.12,    15.50,    28.01,    12.00,       18.00}; //lower threshold    <----------(the extra array slot is for )
float HighVal[6] =        {7.00,    11.99,    28.00,    80.86,    15.49,       22.18}; //upper threshold    <----------(calibration "if misfire"    )
const byte ChuteAngle[5]= {  32,       60,       90,      125,      158}; //chute angles
float hue = 0; //output color of skittle
float avg; //a variable that we probably shouldn't be calling here but it's late at night so we'll do it anyways.

//counters
unsigned char CurChuteAngle = 2;//current position of the shoot
int ServoAngle; //needed this here (instead of in the function) for testing.  might as well leave it since it's not hurting anything here.
unsigned char DemoI = 0; //used to keep track of which process we're at as we cycle through demo mode
unsigned char i;  //counter


void setup() {  //let's get this party started


  //Initialize.  SET STUFF UP!!!
  Serial.begin(9600); // start the serial communication
  Serial.println("\n\n\n\n\n\n"); //clear the serial screen if there was any data already there for some reason

  if (tcs.begin()) { //initialize connection with TCS34725.  Do it this way so that the machine will bork if something's not right
    Serial.println("Type 'help' for a list of commands");  //filler.  Need to display this message to the user anyways.
  } else {
    Serial.println("No TCS34725 found ... check your connections");
    while (1); // halt!
  }

  TopServo.attach(9);  // attaches the servo on pin 9 to the servo object "TopServo"
  BottomServo.attach(10); //same only not the same.

  pinMode(pinLED, OUTPUT);  /*set LED for output on 'pinLED' so we can turn on and off the LED on the TCS34725.  We use a variable here instead of
                            calling the pin directly to make it easier on ourselves later if we decide to change the wiring for some reason.*/


  //Get the machine into "home" position:
  digitalWrite(pinLED, LOW);  //turn the darned light off!  It hurts my eyes!!!  SHUT THE DOOR!!!!!!!!
  TopServo.write(TubeAngle); /*Move rotor under the tube.  We want the rotor to always be in this position unless we are doing something.
  BTW, Chute moves to 90 degrees on it's own.  Happy accident.  I legit don't know why it does this.  Someone explain it to me. */

}  //ready to rock and roll.


void loop() { //main opreration.  Do this until the batteries die.

  if (Serial.available()) { // Check if user input is available on the serial monitor.
    key = Serial.readStringUntil('\n');  //read data if it's there
    key.trim();  //i forget.  this escapes the user pressing enter or something.  I can't remember.  It was 1am when I put this in.


    /*now that we've got good formatted user data sitting on key, lets see if it matches one of our preset commands.


    We have 3 operating modes, RUN, SETUP MODE, and DEMO MODE.  First, lets take a look at the commands we want to have run
    no matter what mode we are in*/
    if (key == "enter setup" or key == "setup") {  //if user input (key) == THIS,
      SetupMode = true;                            //do that
      MachineOn = false;                           // and that
      Serial.println("Entering setup mode");       // and give some feedback to the user.  (In this case, we entered setup mode.)
    } else if (key == "exit") {                    //if key WASN'T that, well how about this instead?
        if (SetupMode == true) {
          SetupMode = false;                       //what you're seeing here with the two IF's is that we needed to deliver seperate messages
          Serial.println("Exiting setup mode");    //oh we're in setup mode?  well lets say 'exit setup'.  Oh we're in demo mode?  good.  say it.
        }
        if (DemoMode == true) {
          DemoMode = false;
          Serial.println("Exiting demo mode");
          TopServo.write(TubeAngle);               //just in case user left demo and machine wasn't in home position, "put it back in home"
          DemoI = 0;                               //reset our cycle counter to match that we are in home position just in case we go back into
        }                                          //demo mode in the future.
    } else if (key == "start") {
        MachineOn = true;
        Serial.println("Turning machine on");
        TopServo.write(TubeAngle);
        DemoI = 0;                                 //not sure why I did this.  Might have been a mistake.  If I pull it, the machine probably
    } else if (key == "demo") {                    //won't run every again.
      DemoMode = true;
      Serial.println("demo mode activated.  Press \\ to cycle.");
    }  //end general commands


    //cool.  Now let's process "run mode exclusive commands (we are in run mode when SetupMode = false and DemoMode = false)"
    if (SetupMode == false && DemoMode == false) {  //are we in run mode?
      if (key == "stop") {
        Serial.println("Turning machine off");
        MachineOn = false;
      } else if (key == "help") {  //display help menu.  God I hate doing it this way.
        Serial.println("\n\n\n\n\n\n\Run Mode Commands\n"  // \n = Next line.  Like hitting ENTER on the keyboard... or is it RETURN?  (I'm old.)
        "start = turn machine on\nstop = turn machine off"
        "\nsetup = enter setup mode\ndemo = enter demo mode");
      }
    } //end RUN MODE commands


     //That was fun! How about we do the SetupMode commands next?
    if (SetupMode == true) { //are we in setup mode?
      if (key == "\\") {// "\" is a special character so we have to escape it using \, so it looks like \\..  which is weird.
        Serial.println("Firing just one Skittle");
        FireTheSkittle();
      } else if (key == "'") {
          FireSensor();
      } else if (key == "help") {
        Serial.println("\n\n\n\n\n\n\Setup Mode Commands\n"
        "\\ = fire single Skittle\n' = fire sensor, get output\n"
        "misfire,red,orange,yellow,green,purple = take 5 and average\n"
        "bottom = select bottom servo\ntop = select top servo\n0-180 = move active servo to this angle"
        "\nstart = exit setup and run\nexit setup = just exit");
      } else if (key == "top") {
        TopServoActive = true;
        Serial.println("Top servo active");
      } else if (key == "bottom") {
        TopServoActive = false;
        Serial.println("Bottom servo active");
      } else if (key == "red") {                   //red skittle threshold value calculate (This could be looped but I decided I like to suffer.)
          ColorSetup("RED", 0);
      } else if (key == "orange") {                //orange skittle threshold value calculate
        ColorSetup("ORANGE", 1);
      } else if (key == "yellow") {                //yellow skittle threshold value calculate
        ColorSetup("YELLOW", 2);
      } else if (key == "green") {                 //green skittle threshold value calculate
        ColorSetup("GREEN", 3);
      } else if (key == "purple") {                //purple skittle threshold value calculate
        ColorSetup("PURPLE", 4);
      } else if (key == "misfire") {               //no skittle threshold value calculate
        ColorSetup("MISFIRE", 5);
      }

      //lets convert string to number and check if there's any angle commands we should do (still in setup here)
      ServoAngle = key.toInt();
      if (ServoAngle > MinChuteAngle && ServoAngle < MaxChuteAngle && TopServoActive == false) {  //did the user put in angles that won't distroy the machine?  Are we on Bottom Servo?
        BottomServo.write(ServoAngle); //cool.  The user isn't going to blow up our machine.  Swing the servo to desired angle.
        Serial.print("Rotating Bottom servo to ");  //Give some feedback.
        Serial.print(ServoAngle);
        Serial.println(" degrees.");
      }
      if (TopServoActive == true && ServoAngle > 0) {  //There's a glitch in the code... if the user put in any writing, it will resolve to "0"
        TopServo.write(ServoAngle);                    //we we do the number convert on line 232.  So we can't accept a 0 angle input else the
        Serial.print("Rotating top servo to ");        //machine would always try to swing the rotor back to 0 if the user typed anything other
        Serial.print(ServoAngle);                      //than an angle input.  No bueno.  I lost sleep on this one.  Compromises must be made.
        Serial.println(" degrees.");
      }
    }//end setup commands


    //Last but not least, lets talk about DemoMode Baby!
    if (DemoMode == true) {
      if (key == "help") {
        Serial.println("\n\n\n\n\n\n\Demo Mode Commands\n"
        "\\ = cycle the machine forward"
        "\nstart = exit setup and run\nexit demo = just exit");
      } else if (key == "\\") { //fire with \ key.
        ++DemoI;//DemoI stores what position the machine is in so we know what to do the next time we loop around "++" adds one to the current value.
        switch (DemoI) { // think of this as a fancy IF statement that really cleans the code up.  "Let's take a look at DemoI"
          case 1:  //"If DemoI == 1,"
            MoveToTube();  //do this
            break;//end code for "1".  very very important.  If no break, it'll won't move out but go into the next case too.
          case 2: //"If DemoI == 2"
            MoveSkittleToSensor(); //do this
            break; //break case, exit the switch code.
          case 3:
            FireSensor();
            break;
          case 4:
            MoveTheChute();
            break;
          case 5:
            MoveToDrop();
            DemoI = 0;
            break;
        }//end case code
      }
    }//end commands for Demo


  }//end code relating to "if the user sent information through the serial monitor"


  if (MachineOn == true) {//is the machine running?
    FireTheSkittle();//call subroutine "FireTheSkittle".  I did it this way to allow Demo and Setup mode to have control without rewriting code.
  }
}//end void loop, cycle back to the top of void loop code and do it again.


//begin subroutines


void FireTheSkittle() { //subroutine FireTheSkittle
    MoveSkittleToSensor();//call these other routines (I did it this way so I could add or remove steps and cycle through with Demo Mode)
    FireSensor();
    MoveTheChute();
    MoveToDrop();
    MoveToTube();
}


void MoveSkittleToSensor(){ //move from home (TubeAngle) to Sensor.  wait for the servo to catch up to the code.
  TopServo.write(SensorAngle);
  delay(WaitOnServo);
}


void FireSensor(){ //operate the sensor and get a value
  digitalWrite(pinLED, HIGH);//turn on the led... let's light things up so we can see!
  delay(LEDDelay);//we are running almost faster than light at this point so we need to give everything time to light up!  incredible!
  uint16_t red, green, blue, clear; //i stole this code (hue is complicated and it was late).  I'll lay low until we're back on my code again.

  // Read raw color data from the sensor
  tcs.getRawData(&red, &green, &blue, &clear); //

  digitalWrite(pinLED, LOW);  //I WROTE THIS!!! WE NEED TO SHUT THE LED OFF BECAUDE WHO PAYS THE BILLS?????  SHUT THE LIGHT OFF!!!!

  // Calculate normalized RGB values (0-1 range)
  float r_norm = (float)red / clear;
  float g_norm = (float)green / clear;
  float b_norm = (float)blue / clear;

  // Calculate hue using the standard formula (you can find more refined formulas online)
  float maxVal = max(max(r_norm, g_norm), b_norm);
  float minVal = min(min(r_norm, g_norm), b_norm);
  float delta = maxVal - minVal;

  if (delta == 0) { // Achromatic (grayscale)
    hue = 0;
  } else if (maxVal == r_norm) { // Red is the dominant color
    hue = 60 * fmod(((g_norm - b_norm) / delta), 6);
  } else if (maxVal == g_norm) { // Green is the dominant color
    hue = 60 * (((b_norm - r_norm) / delta) + 2);
  } else if (maxVal == b_norm) { // Blue is the dominant color
    hue = 60 * (((r_norm - g_norm) / delta) + 4);
  }

  // Ensure hue is positive (0-360 range)
  if (hue < 0) {
    hue += 360;
  }

  Serial.print("Hue: ");
  Serial.println(hue);
}


void MoveTheChute() {//now that we've got hue information, we've got to determine what color and swing the chute around to the right position.
  Serial.print("The color is ");//give some feedback (mostly for setup purposes)
  for( i = 0; i < 5; ++i) {//this is what a typical loop looks like.  For i=0, do until i<5 no longer applies, increment and save i by 1.
    if (hue >= LowVal[i] && hue <= HighVal[i]) {//these are arrays, a varible with multiple slots, access it by variable[1], variable[2], etc
      Serial.println(ColorNames[i]);//in this case, we are looping and counting i, say we are on 3, ColorNames[3] == "Green"
        BottomServo.write(ChuteAngle[i]);//  "WAIT!", you say, "SHOULDN'T 3 be YELLOW???"  very observant.  Arrays start with 0, not 1.
        delay(ChuteDelay);//computers are weird like that... starting with 0 instead of one.  Or maybe we're weird, IDK.  But with arrays,
        CurChuteAngle = i;//slot 1 is 0, slot 2 is 1, etc... so 3 is Green, not Yellow.  You get used to it.  Stupid computers!
    }
  }//end loop.  go back up to "if hue >=" until i < 5 is no longer true, then move on.
}//end subroutine.


void MoveToDrop(){ //move rotor to drop skittle through the hole.
  TopServo.write(DropAngle);
  delay(WaitOnServo);
}


void MoveToTube() { //we have done our work.  return rotor home to collect the next skittle and wait for another day.
  TopServo.write(TubeAngle);
  delay(WaitLong);
}


int ColorSetup(String Color, unsigned char c) {//here is a subroutine where we are receiving info. See void is now int and () has stuff in it that's
  BottomServo.write(ChuteAngle[c]);            //seperated by commas?  Those are different variables we are assigning to the info received.
  delay(ChuteDelay);                           //the sender is seperated by commas too so it all matches up and the script knows what to do.
  avg = 0;//lets find an average.  first zero it out.
    for(i = 0; i<5; ++i) { //typical loop
      MoveSkittleToSensor(); //do stuff
      FireSensor();
      MoveToDrop();
      MoveToTube();
      if (Color != "MISFIRE" && hue >= LowVal[5] && hue <= HighVal[5]) {  //did we have a misfire while on one of our colors?
        i = i - 1;  //if so, than this cycle didn't count and we need to do it over again.
      } else { //if we did NOT have a misfire,
        avg = avg + hue; //add the value to "hue" which we'll divide by 5 later.
      }//end if

    }//end loop


    Serial.print("Total=");//give the user some information.
    Serial.print(avg);//notice we are not using .println   LN... so this builds everything on the same line as a sentence.
    avg = avg / 5;
    Serial.print(".  Average=");
    Serial.println(avg);//here we use .println to start a new line after we print our avg variable.
    avg = avg - 1;  //calculate lower threshold.  I'm just guessing with minus 1.  You probably want to widen it as far as possible.
      Serial.print(Color);
      Serial.print(":  Low threshold = ");
      Serial.print(avg);
      LowVal[c] = avg;  //Store it in proper location.  Value will be reset if you unplug the arduino.  Sorry about that.
      Serial.print(".  High threshold = ");
      avg = avg + 2;  //remember im going +/-1.  we took one off so we've got to add 2 to get to our upper threshold now.
      Serial.println(avg);
      HighVal[c] = avg;//store the value.

}
After you wire the machine up, upload the code to the microcontroller.
Setup the rotor!
We need to tell the microcontroller where the rotor should stop under the tube to receive a skittle, ANDDDDD…. we need to tell it how far to rotate the rotor so that it drops the skittle down the chute.
How do we do this? Well let’s put the servo in a “known good” position so that we can install the rotor in a “known good spot” and we’ll go from there.
With the Ardruino hooked up to the laptop and code uploaded through IDE, open the serial monitor at the top left. Arduino may report something like “type help for menu”. You might need to unplug and plug it back in. I’m going off the top of my head here.
Assuming the microcontroller is talking to the serial monitor correctly,
type “setup” into the serial monitor to enter setup mode.
Micro will respond “Entered Setup Mode”
Type “top” to access the top servo
Type “160” to swing the servo motor into “setup position”.
While holding the machine by the servo so that you don’t crush any of the delicate cardboard, VERY CAREFULLY install the rotor so that the hole is in line with the hole the skittle will drop down the chute. The rotor has splines so if it doesn’t match up with the hole perfectly, set the rotor one tooth back towards the sensor if all else fails with the alignment.
Here’s an old pic of what the rotor should look like if you were looking straight down on it, “either perfectly aligned or turned clockwise 1 spline”

Type “10” in the serial monitor to swing the rotor close to the drop down tube. Fiddle around with the number until the rotor looks like it’s in a good position to catch a skittle and then put your number in here:

Line 59, update TubeAngle with your number.
Type “170” into the serial and see if this looks pretty good for dropping the skittle to the chute. If not, fiddle with your numbers to find what you like and change line 61 “DropAngle” to your new number.
“SensorAngle” on line 60 is where the machine stops to check the color. This should be good but if you need to make an adjustment, this is where you would make the change.
Lines 62 and 63 are to keep the chute from slamming into the frame at either extreme so if you’re having issue, this is where the max limits are.
Once you feel the values should be good, upload the new code, enter setup again and fire a few skittles by sending “\” through the serial monitor. If things work ok, move onto the installing the chute. If not, make a few adjustments and try again!
Install the Chute!
type “bottom” to access the bottom servo.
type “90” for the install angle.
Attach the chute pointing straight out from the machine, or as close to it as possible.
Find the averages!
I’m not sure we are going to do this because the default values are pretty good. If you need to reset your averages, pull up your help menu for a refresher on the color command codes. Empty the input tube and run “Misfire”, then place 5 of a color and run the corresponding color command in the Serial. The machine will fire the 5 skittles, average, and calculate reasonable min / max values to put into this chart on lines 80 and 81.

Also, if you need to micro adjust the chute angle, you can do it on line 82. Heck, if you wanted to completely change the order of the color bins, you could do it here by swapping… say…. red and orange’s chute angle values and TADA! Red would now go where orange used to and vice versa.
Run!
Send “exit” to exit setup.
Send “start” to start the machine.
Send “stop” to stop the machine.
Have fun!
Challenge!
I PURPOSEFULLY made this machine dysfunctional. Skittles get stuck, hop over the chute walls, bounce out of the container tray, it gets purple and yellow confused!
I challenge you to observe the machine operating. What would you do different? What could be done better? Do you think maybe a toliet paper roll would work better for the chute? Maybe a steeper angle? How about deeper, larger trays to catch the skittles?
I’m curious to see what your revision 2.0 would look like! Draw it on a napkin and I’ll get Mr. E to display it on the AA8 facebook page for everyone to see your great ideas. Heck, before you know it, you’ll be designing the next Hover Board and I’ll be here to help you do it!
~Richard Mendenhall Jr.
PS, Thank you from way deep down in my heart for coming out and getting some coding in with us. This is my passion and I love to share it with you.
That’s all for this week. Be sure to get your revision 2.0 drawings in to me. See you next week!!!!